BrightPay's payroll journal feature allows users to create wages journals from the finalised payslips and to export to CSV for upload into Xero accounting software.
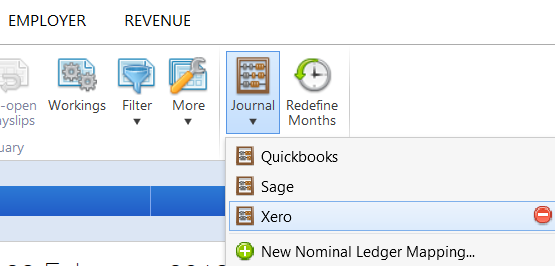
1) Within Payroll, select Journal on the menu toolbar, followed by Xero:

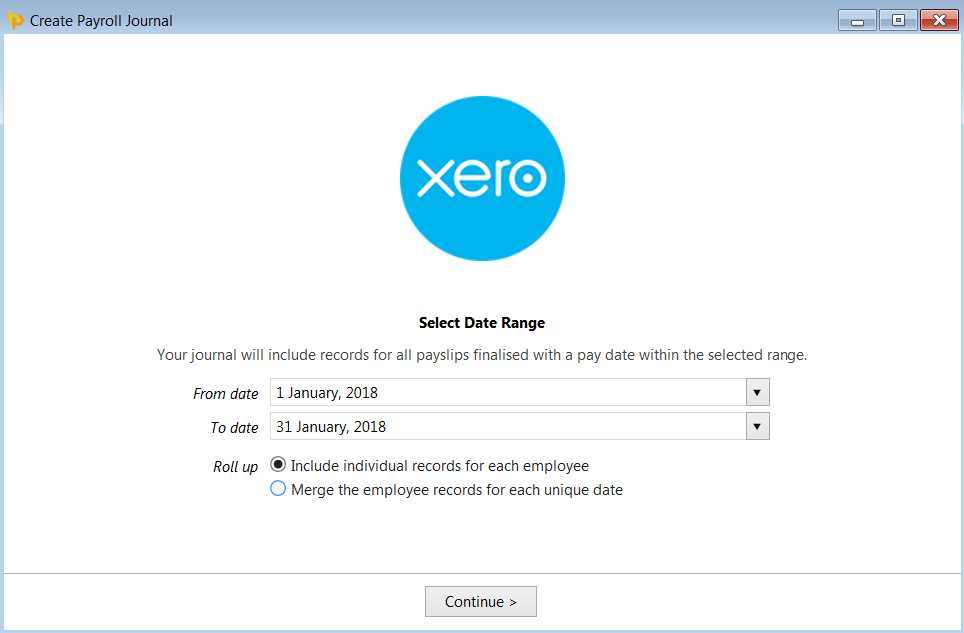
2a) On the next screen, set your Date Range - the journal will include records for all payslips (across all pay frequencies) with a pay date within the selected range.
b) Roll up - select whether you would like the journal to include individual records for each employee or whether to merge the records for each unique date.

c) Click Continue
3a) Nominal Ledger Mapping - the default nominal ledger code mappings which specifically relate to Xero will already be entered for the user.
If desired, these can be edited, should the user wish to map to different nominal accounts that exist within Xero. A nominal account code can be used for multiple items.
b) When ready to proceed, click 'Continue'.
4) Nominal Ledger Mapping (Director Items) - this screen allows you to map directors' pay items to alternate nominal accounts within the Xero software.
a) Should you wish to map to alternate nominal codes for any payroll items relating to directors, simply click 'Yes' and enter/amend the nominal account codes and descriptions accordingly.
b) When ready to proceed, click 'Continue'.
5) Nominal Ledger Mapping (Custom Items) - this screen allows the user to map custom pay items in BrightPay to other specific Xero nominal account codes of their choosing. Examples of custom items include addition/deduction types, rates, pensions, etc.
Please note: where you do not choose to use a specific code, such pay items will be included under the relevant general code that has been entered previously.
a) Debits - debit items represent 'additions'. To allocate a specific nominal account code to a customised pay item:
i) select the pay item from the drop down menu
ii) enter a new nominal account code and description in the fields provided or select an existing nominal account from the drop down menu.
b) Credits - credit items represent 'deductions'. To allocate a specific nominal account code to a customised pay item:
i) select the pay item from the drop down menu
ii) enter a new nominal account code and description in the fields provided or select an existing nominal account from the drop down menu.
c) Should you require additional fields, simply click 'Add Debit Item' or 'Add Credit Item' accordingly.
d) When ready to proceed, click 'Continue'.
Your journal will now be displayed on screen for review. Simply click the 'Back' button to make any amendments.
6a) When ready to export the journal to CSV, click 'Export Xero CSV File...'
b) Browse to the location where you would like to save your CSV file to, then click 'Save'.
c) Press 'Print' to print or export a copy of your journal to PDF.
d) To close the journal screen, simply click the cross at the top right of this screen. If you have made any changes to the journal, you will be asked if you wish to save your changes. Click 'Yes' or 'No' as required.
Your payroll journal is now ready for upload into your Xero accounting software.
Need help? Support is available at 01 8352074 or [email protected].